
The performance and user experience of your website may be negatively impacted by the 504 Gateway Timeout Error, and it may even drive away potential customers. The good news is that it’s not an irreversible setback.
This error happens when a server tries to communicate with another server but does not receive a timely response.
This blog post walks you through the process of fixing the WordPress 504 Gateway Timeout Error step-by-step.
What Causes the 504 Gateway Timeout Error?
There are several reasons why your WordPress site might be experiencing the 504 Gateway Timeout error. Here are some common causes to consider:
- Slow server response time—If your server takes too long to respond, you may receive a 504 error.
- High website traffic – An influx of visitors can overwhelm your server’s resources, leading to a timeout error.
- Plugin or theme conflicts – Certain plugins or themes may conflict with each other or with your server configuration, causing the error.
- Server misconfiguration – Improper server settings or configuration can trigger the 504 error.
- DNS issues – Problems with your DNS settings can prevent your server from connecting to the requested page.
- Network congestion – Issues with network connectivity, either on your end or your hosting provider’s end, can lead to timeout errors.
Identifying the specific cause of the 504 Gateway Timeout error will help you apply the appropriate solutions to resolve it.
Top 5 Methods to Fix “504 Gateway Timeout Error “
- Reload the page
- Clear browser cache
- Enable debugging mode
- Disable plugins
- Increase PHP memory limit
Method 1: Reload the Page
Reloading the page that is causing the 504 Gateway Timeout problem is one of the easiest and fastest fixes to try. Reloading the page can fix a temporary problem in certain cases. Refreshing the page or utilizing the keyboard shortcut F5 or Command + R will initiate a fresh request to the server, which may resolve the issue.
Method 2: Clear Browser Cache
Clearing your browser cache is another effective method to fix the 504 Gateway Timeout error. Caches store temporary files; if they become corrupted or outdated, they can cause issues when loading web pages.
Follow these steps to clear your browser cache and potentially resolve the error:
- Launch your web browser and navigate to the settings menu.
- Go to the browsing history or privacy settings section.

Find the clear browsing data option and choose it.

- Choose the desired time range to clear the cache.
- Select the cache type you wish to clear, such as cookies or browsing history.
- Click the “Clear data” or “Clear cache” button to remove the selected data.
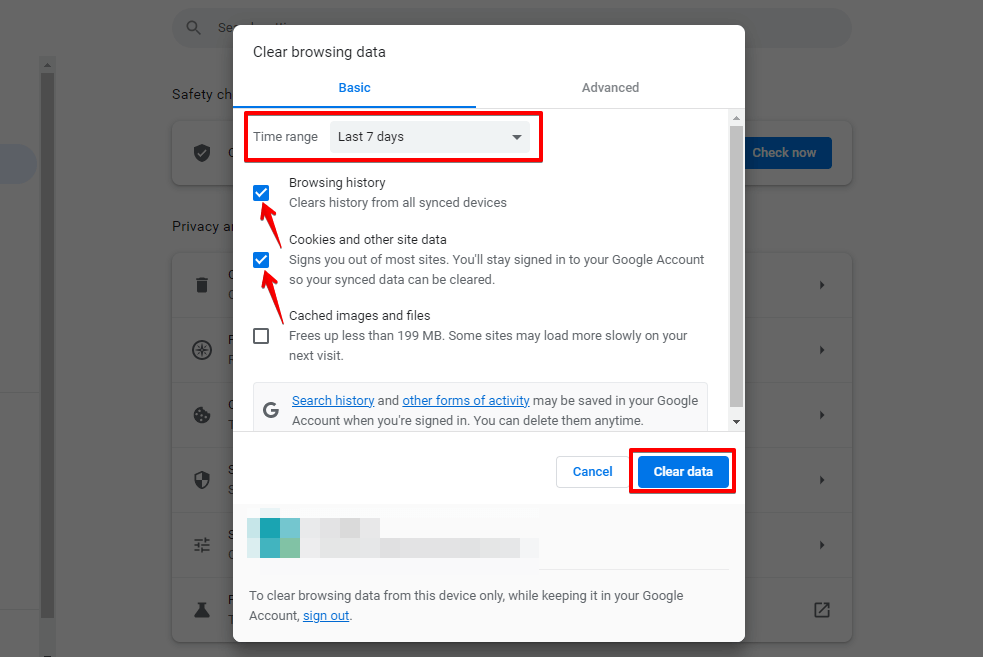
After clearing the cache, try reloading the webpage to see if the 504 Gateway Timeout error is resolved.
Method 3: Enable Debugging Mode
Turn on WordPress’s debugging mode to collect more precise error data that will help identify the root cause. To activate WordPress’ debugging mode, take the following actions:
- Log in to your cPanel account provided by your hosting provider.

- In the cPanel dashboard, locate the “File Manager” option and click on it.
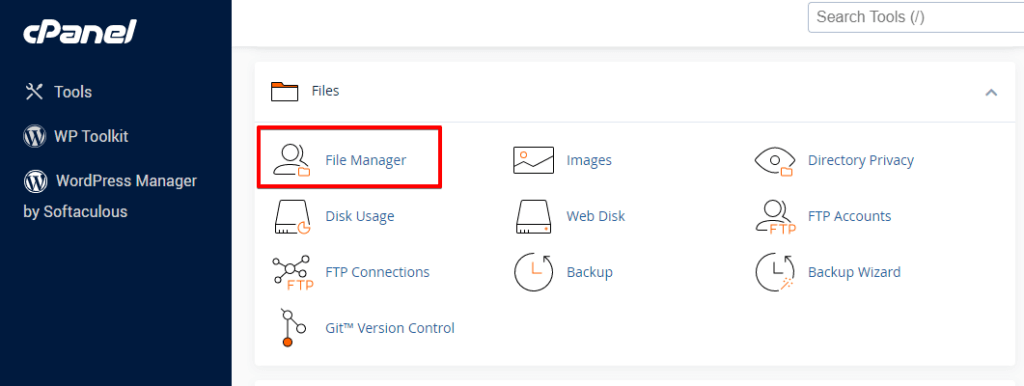
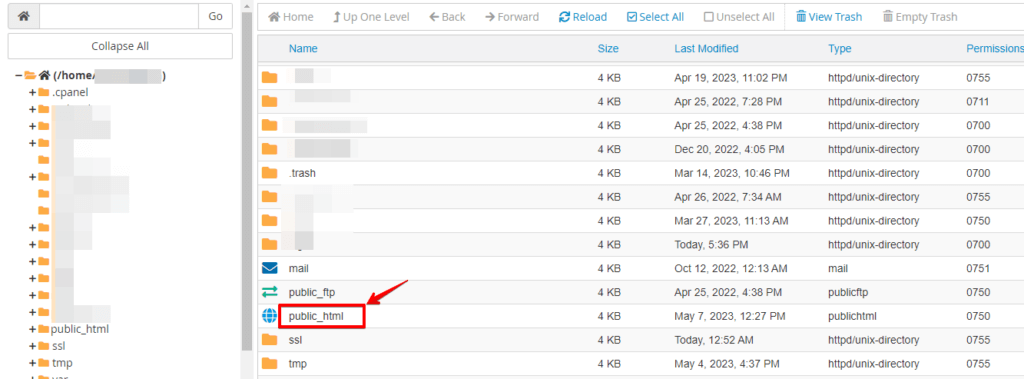
- Navigate to the root directory of your WordPress installation (usually public_html or www).

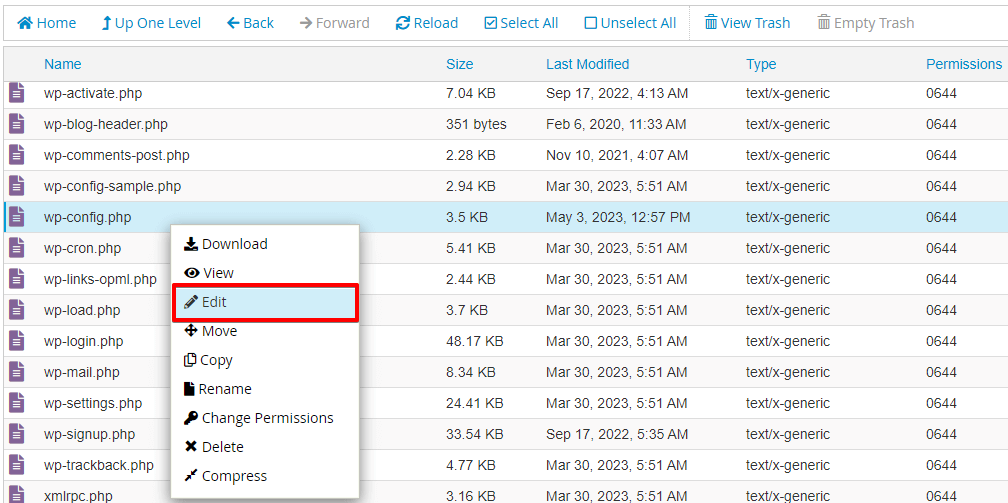
- Find the wp-config.php file and right-click on it.
- Choose the “Edit” or “Code Edit” option from the context menu. If prompted, select “Edit” again.

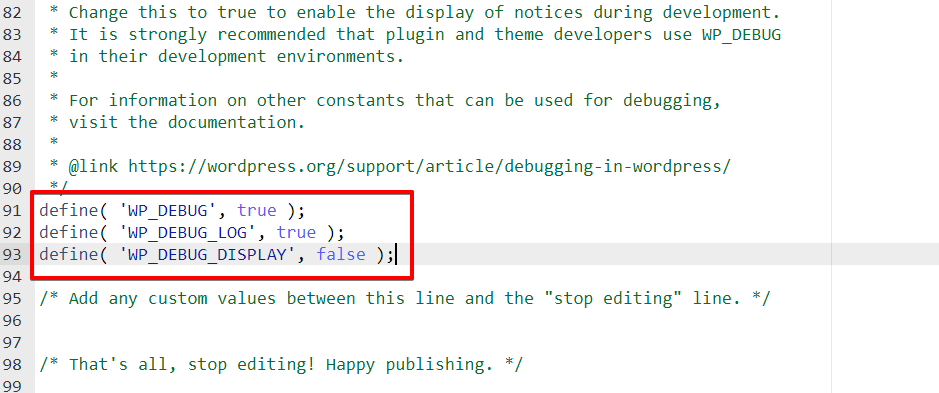
- Look for the line in the wp-config.php file that says
/* That's all, stop editing! Happy blogging. */. - Just above that line, add the following code:
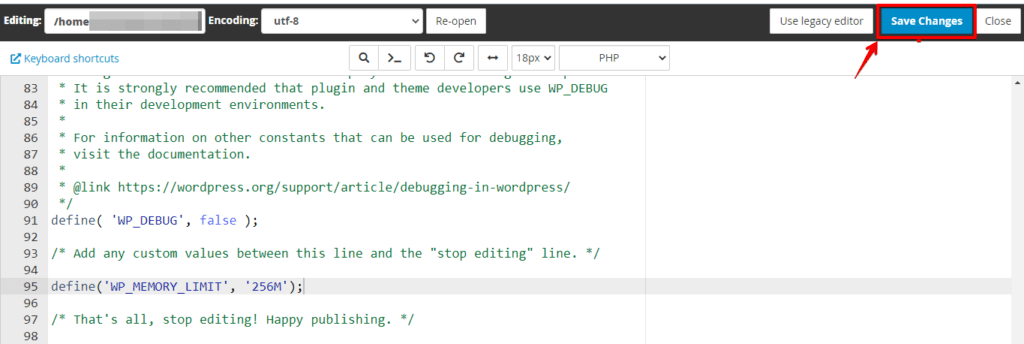
- Save the changes to the wp-config.php file.
- Close the file manager and access your WordPress site.
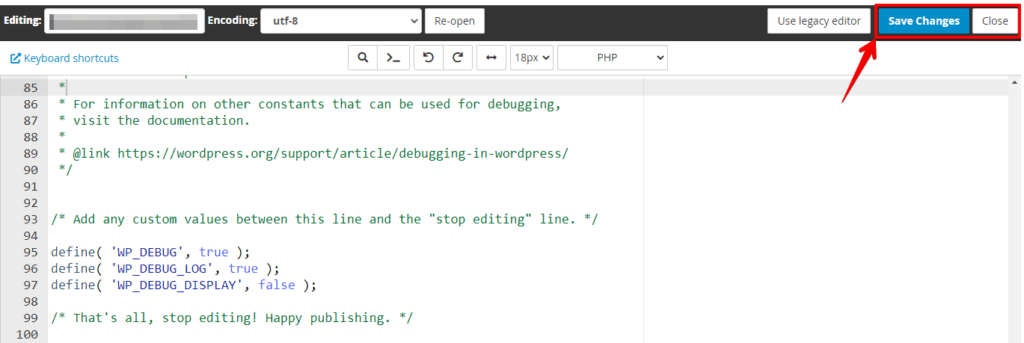
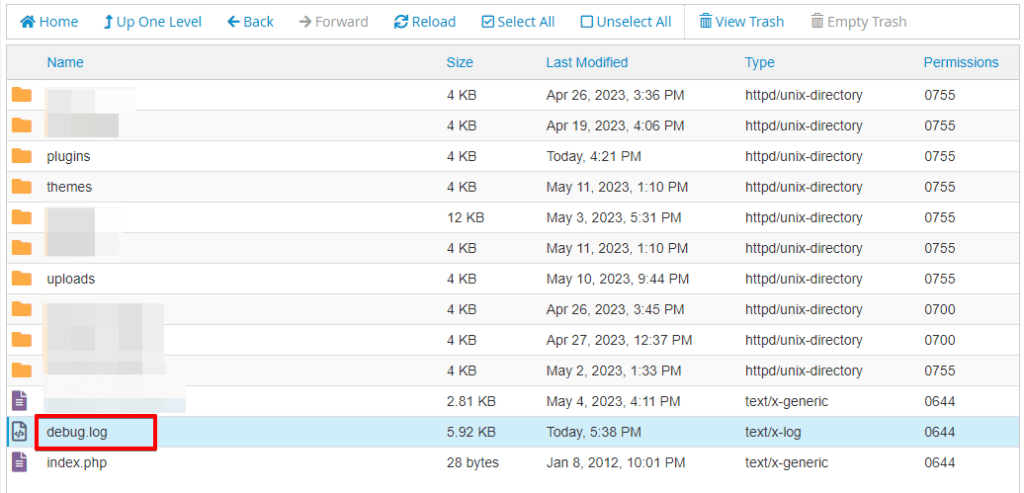
- The debugging mode should now be enabled, and you can find the debug logs in the wp-content/debug.log file if any errors occur.
Remember to disable debugging mode once you resolve the issue to avoid displaying sensitive information to visitors to your site.
Method 4: Disable Plugins
Deactivate plugins to identify if any are causing conflicts resulting in the 504 error.
To disable plugins in WordPress, follow these steps:
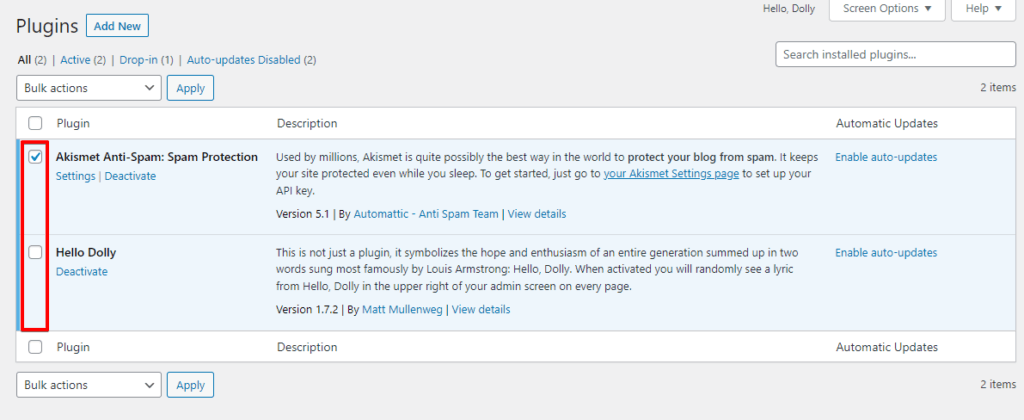
- Access your WordPress admin dashboard by logging in to your site.
- Go to “Plugins” from the sidebar menu and click on it.
- You will see a list of installed plugins.

- Select the plugins you want to disable by clicking the checkboxes next to their names. You can choose multiple plugins at once.
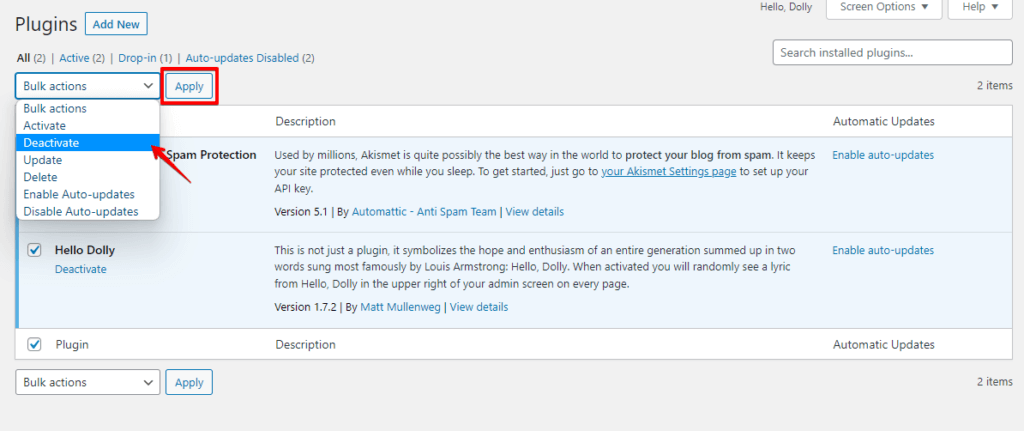
- Once you have selected the plugins, look for the “Bulk Actions” dropdown menu at the top of the list and select “Deactivate.”
- Click the “Apply” button next to the dropdown menu.
- This step will deactivate the selected plugins and temporarily disable their functionalities.
Disabling plugins can help identify if they are causing conflicts or the 504 Gateway Timeout error. You can reactivate the plugins individually to determine which one might be causing the issue.
Method 5: Increase PHP memory limit
Increase the PHP memory limit in your server configuration or modify the wp-config.php file to allocate more resources to your site.
To increase the PHP memory limit in WordPress, you can follow these steps:
- Log in to your cPanel account provided by your hosting provider.

- In the cPanel dashboard, locate the “File Manager” option and click on it.

- Navigate to the root directory of your WordPress installation (usually public_html or www).
- Find the wp-config.php file and right-click on it.
- Choose the “Edit” or “Code Edit” option from the context menu. If prompted, select “Edit” again.
- Look for the line in the wp-config.php file that says
/* That's all, stop editing! Happy blogging. */. - Just above that line, add the following code:
PHP
define('WP_MEMORY_LIMIT', '256M');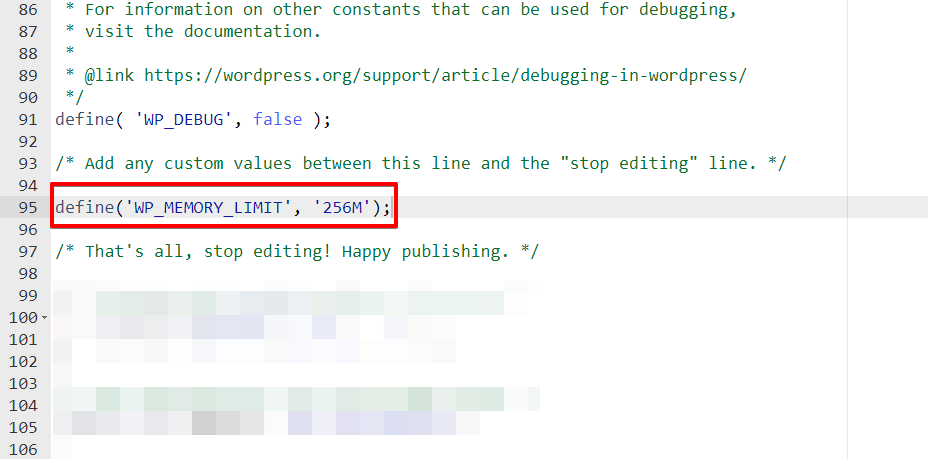
You can adjust the value’ 256M’ to the desired memory limit, such as ‘512M’ for 512 megabytes.
- Save the changes to the wp-config.php file.
- Close the file manager.
- Refresh your WordPress site and check if the PHP memory limit has been increased.